Тут ви дізнаєтесь, як запрограмувати першу гру. Ви повинні допомогти маленькому гепарду уникнути води!
1. Новий проєкт
Спочатку завантажте Pocket Code із Google Play Маркету або з іншого магазину й установіть його. Тепер вам потрібно буде створити новий проєкт:
Ви можете запустити свою програму (свою сцену!) будь-коли за допомогою маленького трикутника внизу праворуч:

Ви можете повернутися до режиму перегляду програміста, натиснувши двічі кнопку «Назад».
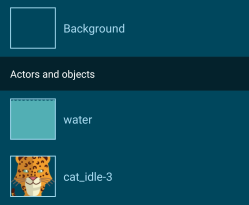
2. Нові обʼєкти
Предмети схожі на ваших акторів у виставі. Отримайте свої зображення з медіатеки:
Ідіть і візьміть також маленького гепарда з медіатеки:

Тепер це має виглядати так:
3. Перший скрипт
Скрипт — це сценарій для ваших персонажів. Скрипти будуються з блоків і завжди починаються з округленого блоку. Ось як ви можете додати нові блоки до свого скрипту:
Створіть цей скрипт у воді:

Увага: будьте обережні з значеннями і параметрами окремих блоків. Змініть значення в блоках «розмір» і «змінити», якщо вода не поміщається на вашому пристрої (торкніться трикутника запуску, щоб подивитися!). Ви отримаєте більше інформації про блок тут.
4. Як я можу перемістити та видалити блок?
Ось як це працює:
Увага: якщо торкнутися початкового блоку (округленого) і вибрати «Видалити скрипт», ви видалите весь скрипт з усіма блоками.
5. Налаштування гепарда
Перейдіть на скрипт гепарда і створіть цей скрипт:
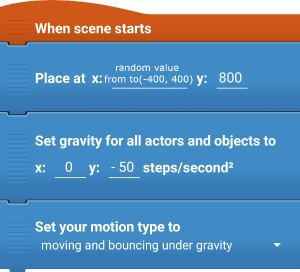
Увага: Знову ж таки, будьте обережні зі значенням. Щоб створити обʼєкт у випадковому горизонтальному положенні, ми встановлюємо значення X випадковим числом від -400 до 400. Ви знайдете функцію випадкового значення в функції категорії (не пишіть функцію з «Абв» самостійно!!!). Установіть нижню межу на -400, а верхню — 400.
Установіть тип переміщення гепарда на "рух і підстрибування під дією сили тяжіння". Тепер гепард діятиме як фізичний об'єкт і буде знесений силою тяжіння (гете з силою -50).
Запустіть свою сцену, щоб побачити, що змінилося!
6. Жонглювання гепардом
Тепер ми крок за кроком розширимо функції гепарда. Додайте цей скрипт у Гепарда (усі скрипти виконуватимуться одночасно):
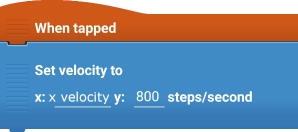
Щоразу, коли ми торкаємося об’єкта, ми встановлюємо швидкість об’єкта на y: 800 (вертикальний напрямок). Це катапультує гепарда вгору. Сила тяжіння, яку ми встановили раніше, розірве гепарда до дна. Як справжній предмет!
Ми встановлюємо X на «швидкість X», що можна знайти в категорії властивостей. (Не вводьте це самостійно за допомогою «Абв»!!!)
Тепер подивіться ще раз! Якщо ви вважаєте, що це надто нудно, просто спробуйте встановити вище значення Y!
7. Let the object bounce
As you may have noticed, the object leaves your screen easily. Here is how you can avoid this:
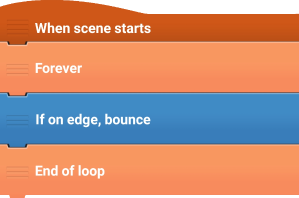
To let the object bounce forever (and not only at the beginning of the scene), add a loop. Loops let you repeat bricks. The "forever loop" will repeat endlessly, at least so long you don't close the program
Start your project and try it!
8. Game Over
Maybe you have noticed, that our game runs forever? Nothing happens if you touch the water. Let us change this:
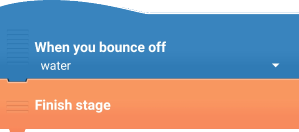
If you bounce off the water, the program will terminate.
If it still didn't work, check if you set the motion type in water to "not moving under gravity".
DONE! You just used only 16 bricks to build a basic game. If it's still not working, just check your bricks once again. Maybe a bug (a programming error) has appeared.
But we are not done here quite yet. Expand your game however you like it! Or be inspired with the following cool functions 😀
Background
Here you will learn how to add a background. The background is also programmable, e.g. with a "set size"-brick.
Background music
That's how you add background music:
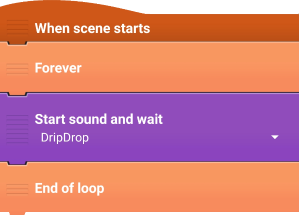
Attention: Take care to select the brick with "and wait", otherwhise weird things will occur, try it!
You can choose sounds from various sources: the media library, record them yourself or get it from your device as audio file.
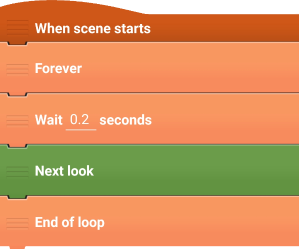
Animations
Add all 3 different looks to the cheetah. They act like different costums for an actor.
After you did that, you can add this script to the cheetah:
Obstacles
Add a new object as obstacle.
Add this script to it, and enable it to move it's position randomly every 3 seconds:
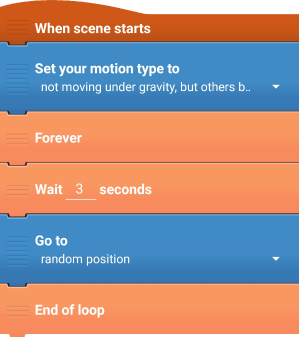
It doesn't work? Check whether you set the motion type to "not moving under gravity".
Points & Highscore
You want points? Add this script to the cheetah:
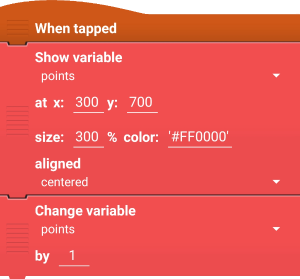
Attention: Create a new variable by tapping "new" and choose a meaningful name. Take care that in both bricks the new variable is selected. You can adjust the appearance with different parameters.
You want also want to add a consistent highscore? To do this, extend this script in the cheetah:
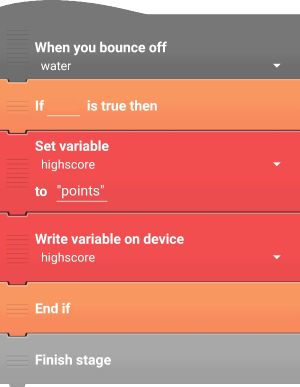
Create a new variable named "highscore". Set the variable highscore to the variable points. You will will points in the data category.
The "if-brick" is called a conditional statement. It acitivates the red bricks only if a condition (abvoe you see a gap) is met, otherwhise they will be skipped. Our condition is: If points are higher than highscore, then... Try to build the condition yourself. You will find all you need in the data and the logic category. (Do not type in the condition with "Abc"!!!)
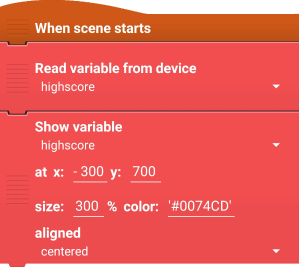
To display the highscore, add this function (select the correct variable!):
Home screen
To add a home screen, we need to create a new scene:

New scenes are like subroutines of your game. They have independent objects and backgrounds. You can connect scenes with the "Continue scene" and "Start scene" bricks.
Add a new object to the new scene. Something like this play button:

Add this script to the button to start the game by tapping it:

Now you can configure the background and maybe include the game name and short instructions! If you want to, navigate to the looks of the background and experiment a bit.
Effects
To add sound effects, you can use the "Start sound" brick. One good place might be right after the "When tapped" in the cheetah.

You can also add rumble effects:

Here's how to change the color of the objects:

Just try different bricks and see yourself 😃
More cheetahs!?
Here you go:

By copying objects, every script of the object and all the looks will be copied along. But if you change single bricks after copying, they won't by synchronised. If you just want to adjust the look of an object, navigate to the looks of it, add a new one and delete the old one.